Scrappy Dress
Hi Friends,
There is so much that went into this dress creatively and technique wise, that I’m not even really sure where to start when describing this project.

March is the last month of my participation with the Mood Sewing Network (all stints are in 3 month increments) and I knew that I wanted to go out with a bang. I had been telling a friend at work, that at least once a year I had to make something completely outlandish and totally overtop. Its almost like a creative itch that needs to be scratched. There is just something so satisfying about a making something completely over the top and then taking editorial photos that feel like they could have come out of Vogue magazine’s pages…. well… that’s the goal anyways. Not sure if my efforts have quite put the at Vogue magazine level… yet.

Either way, this project definitely scratched that itch. Simultaneously while I was pondering what kind of over the top project I wanted to make, I happened upon a tiktok video of someone taking a bunch of thread tail offcuts and sandwiching them between two pieces of tulle and then sewing over them effectively making a new piece of fabric. I believe they then then used that fabric to make a small zipper pouch. All the lightbulbs went off when I saw this and I started thinking about the seemingly endless amount of scraps I have. If this person could make a zipper ouch out of some thread tails, imagine what someone could make out of fabric scraps.

I have mine sorted into large pieces, which are basically yardage, that is refolded and put back on a shelf, medium size scraps (stored in the left side of the cart under my drafting table) that are usually a half yard or less, these are pieces that I can pull from to make facings, pocket linings, collars, masks, ribbons, small gift bags. Basically, they aren’t enough yardage to make something wearable on their own, but they still can be used for some things, so I wouldn’t throw them out #savetheplanet. Lastly is my 15.8lbs (yes I weighted it) bag of threads, serger offcuts, little corners and bits I’ve cut off more usable scraps (though I don’t really do this too aggressively, because you know, lots of pattern pieces have points too).


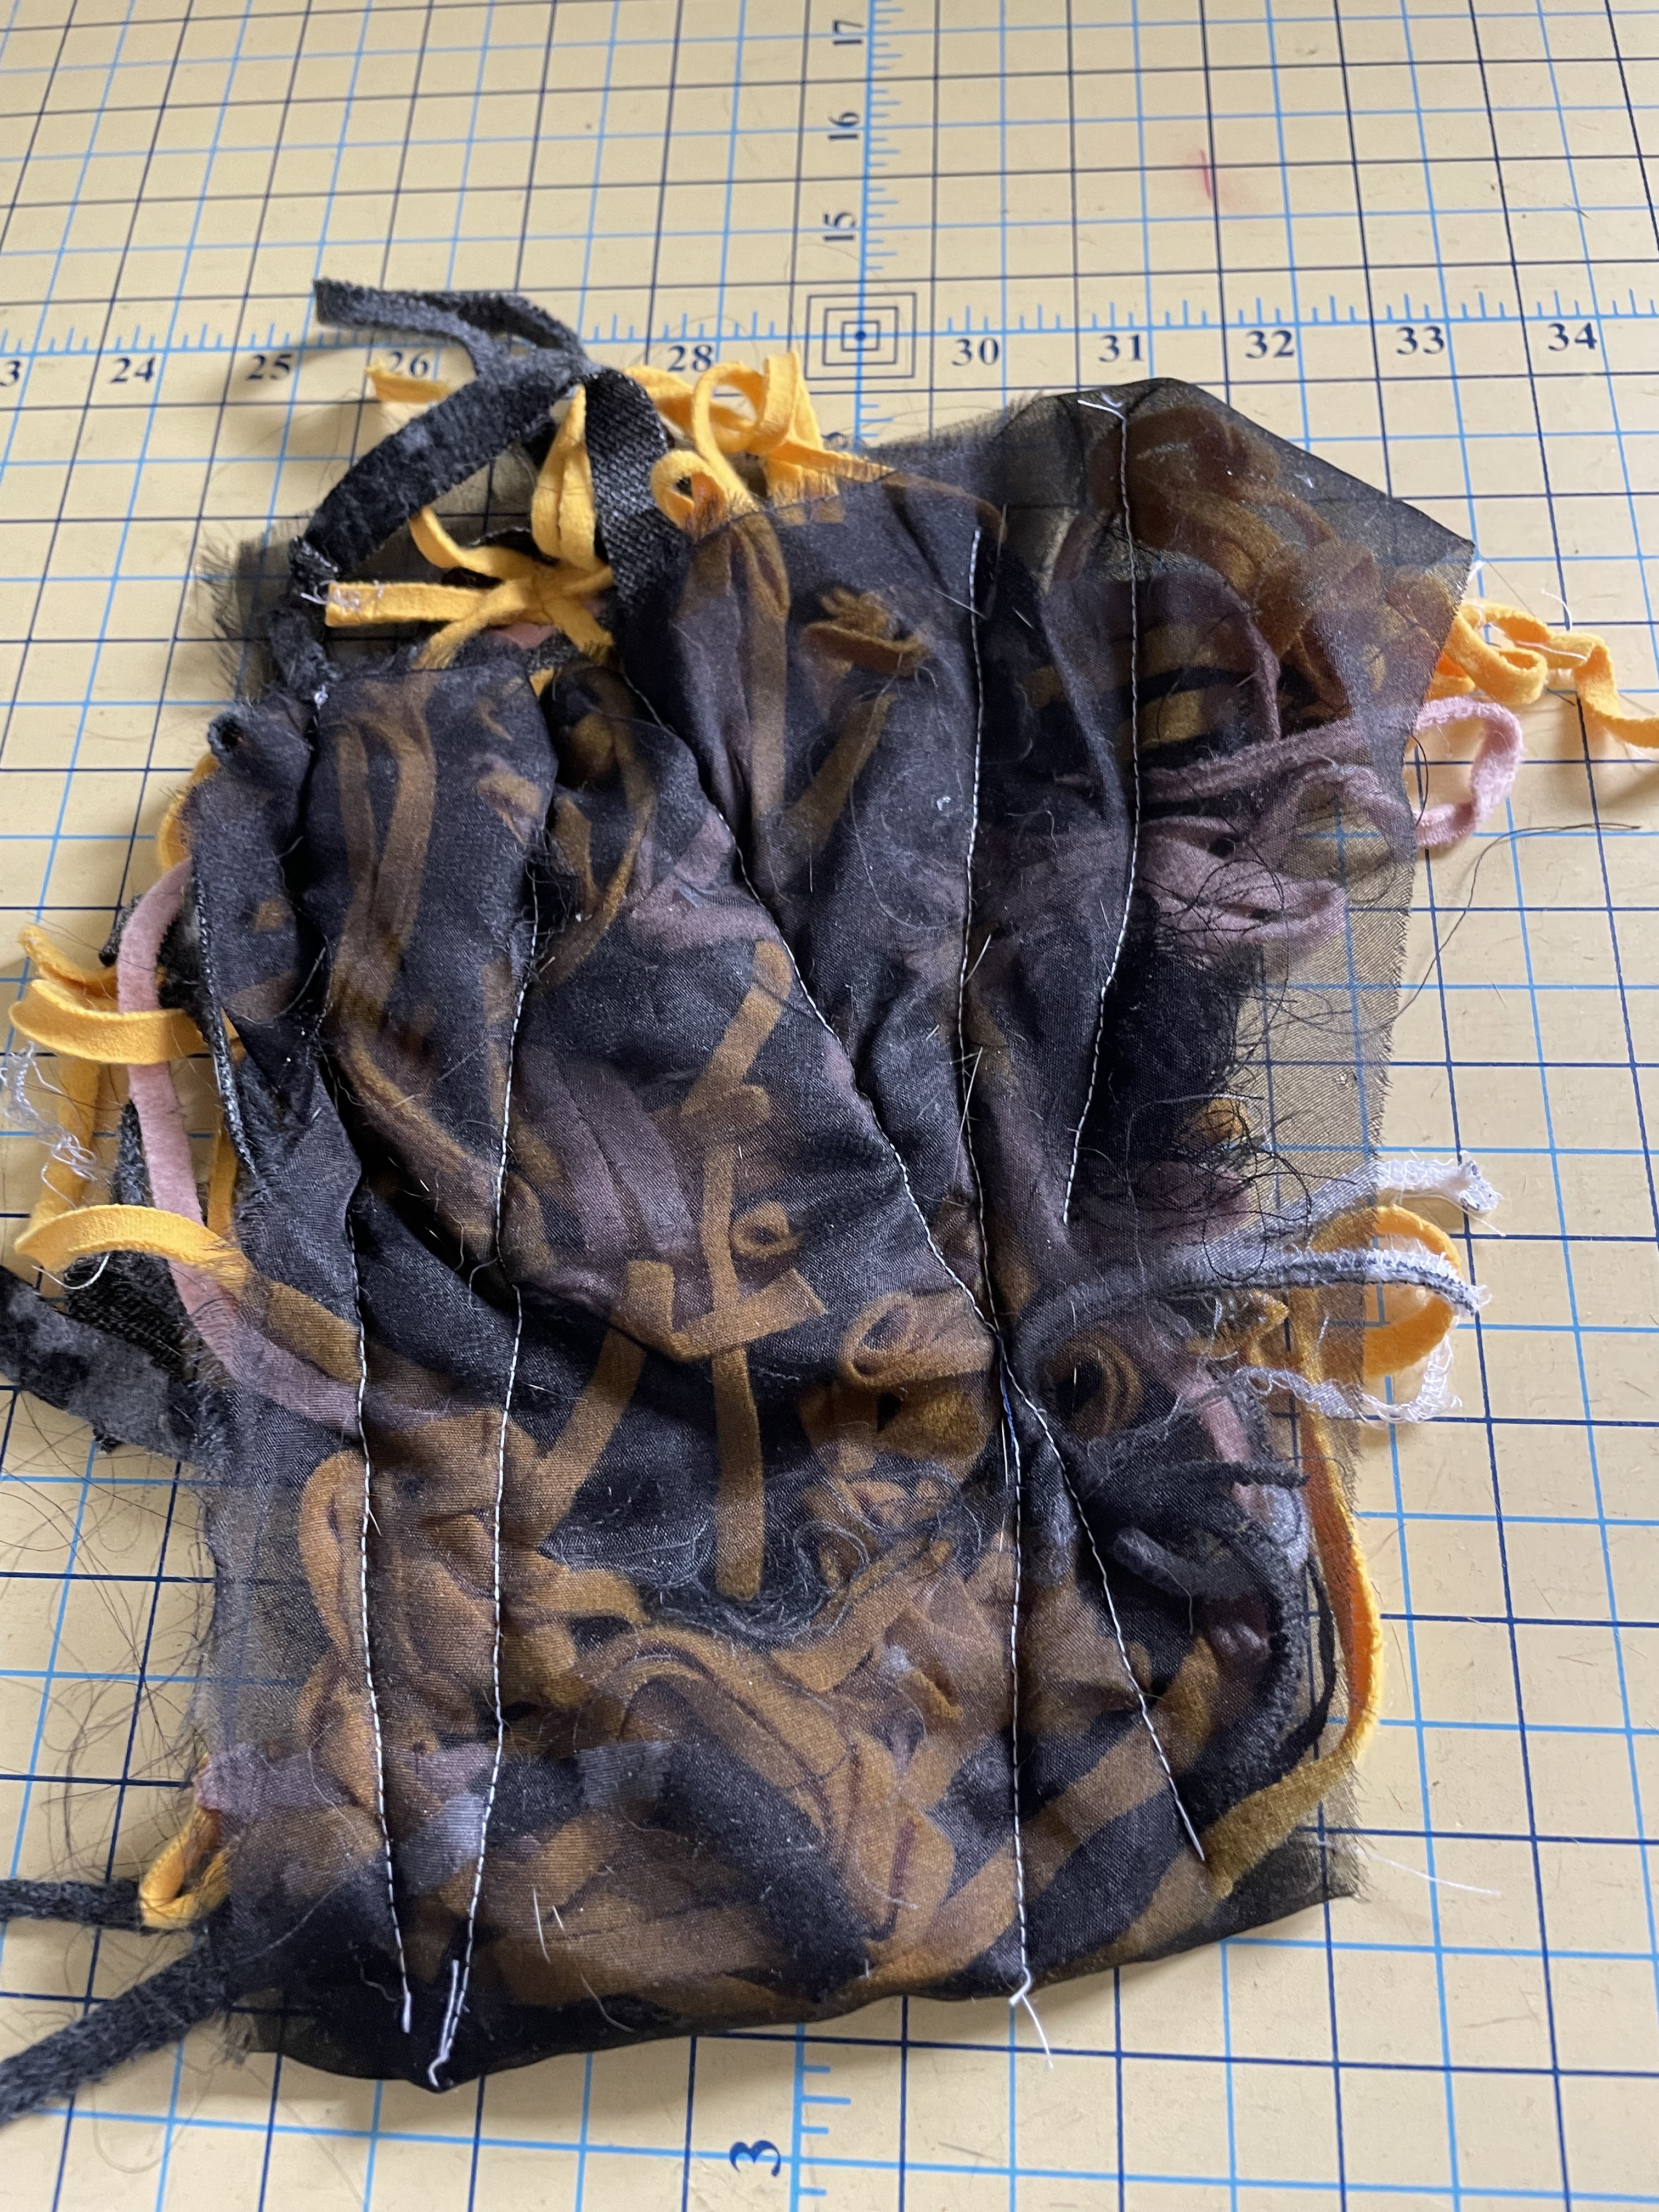
I immediately got really excited about the idea of making something both beautiful and excessive while simultaneously using a significant amount of my scraps. My initial idea was the tackle the 15.8lbs bag of tiny scraps. I wanted to make the whole dress out of sandwiched scrappy scraps, so of course I did a test first, a little proof of concept if you will. I had some left over black organza from a different project I made last year and took some of whatever was on top of the crap pile and made a little swatch. It was easy enough to sew, and it made a nice thick but pliable fabric. So, that was it. Decision made, it was full steam ahead.

The next step was to order some tulle. Which of course sounds counter intuitive, that I would have to order new fabric to be able to use up old fabric scrap, but I’m not here to make sense of the world we live in, I’m just here to create beautiful things, manage my own working space, and keep scraps out of the landfills the best way I can come up with. So I jumped on Moods website and started looking at the black tulle options. For sure I wanted to use back tulle because my scraps were all different colors and the more I could put a unifying tint on them, the better I thought the final outcome would be. There are lots of options for tulle fabrics on Moods website, and I ultimately went with these guys:

I did a lot of hemming and hawing about which tulle fabrics I wanted and I definitely could have ordered swatches, but I was too impatient, so I just ordered a couple yards of each. Keep in mind that I knew I wanted to make a large gown-style garment, and if I haven’t already mentioned this, I knew I wanted it to have a train as well. Thinking about that and knowing that all of my fabric was going to have to be sandwiched between two layers, I knew I was going to need a lot of tulle. The wide tulle I ordered because I thought it was going to be most economical given my needs, and I did end up using this fabric as the top layer of the large back skirt pieces and the top layer of the bodice pieces, the diamond tulle/crinoline I ordered because it sounded like it had more body than the wide back and it does in fact have more body. I used this for both the top and bottom layer of the front skirt pieces and the bottom layer of the back skirt pieces. The cancan tulle sounded like it had the most body (and it does) and I ordered this to use instead of horse hair and also for any embellishments I saw fit, again because it was more economical. I will note, it is definitely not as stiff as horse hair, however, if you’ve been sewing for a long time, you’ll know that ordering trims by the yard does not get you very far, and this dress was going to have miles of hem… so I figured, I would layer it up to achieve the varying levels of stiffness I wanted, and that worked out pretty well for me. I also ended up cutting out the back side of my bodice pieces out of this fabric, which helped give it that stiff corset type feel… that and the quilting I did. I’ll get to that in a bit. There is still a lot of the story to get to before that.

Shortly after ordering my fabrics, but before they arrived it occurred to me that I had sewn my sample in organza and the fabric I had ordered was tulle… which concerned me, because organza is a bit more solid than tulle…. But I told myself there was nothing to be done at that point, and sure enough when the fabrics came, and I was holding them over the fabric scraps I had, the blackness of the tulle, really did little to cast a meaningful tint onto the fabrics, so the colors were really all over the place. I was lamenting this to my husband and we both decided that the best course of action was to dye all the fabric scraps. This was a pinnacle moment and led me down a very long detour that actually did not lend anything to the final garment… but I did learn some very important lessons, like… how to to make shoddy. ** So if you want to skip ahead to the parts that did get incorporated into the final garment, I’ll put another indicator of where to pick up reading, if you want to read more about this long detour, continue on friend **

So, I set about dyeing all 15.8 lbs of fabric scraps that was in this one bag… which was total insanity… If I have one piece of advice to you that came out of all of this, it would be, do not attempt to dye 15.8 lbs of fabric scraps unless you have some well equipped commercial set up that was meant to handle it.


Here are some pictures of the set up I rigged together in my garage. I already had a bunch of Fiber reactive dyes from Dharma Trading Co. These are really only for natural fibers, but I figured I would give it a go even though my scraps ran the gammet of natural and unnatural fibers because that was what I had on hand. My goal was to dye everything as dark as I possibly could, so I used some leftover, raven black, blue grey and navy blue, all mixed together. I think I used something like 10 gallons of water and the equivalent soda ash and dye. To say it was an endeavor would be an understatement. When it was time to take everything out, rise, wash and dry it, it occurred to me, that I was going to have to entrap everything, or A. it would be impossible to rise everything… and B. I would probably break my washer and dryer. So I took one of my skirt muslin pieces that I had draped and was not 100% sold on and sewed it into a giant bag and put all the wet scraps into it. I then tied it closed and blasted the bag with the hose in my driveway while walking on it, trying to get the most amount of water through it and the most amount of excess dye out of it. When I felt like I had done the most I could, I threw the bag into my washing machine.. and then the dryer and hoped for the best.

As you might imagine, it was near impossible for my dryer to get the sopping bag full of scraps dry, so I tied the top a little looser to get more air flow, and when I opened the dryer for the second time… omg… there was so much lint and the scraps were all knotted together and still not completely dry. So I took them out, cleaned up my dryer as best as I could, put all the scraps into an old laundry basket and left it in a very sunny spot in my house… I was immediately apparent, that washing and drying everything had basically created shoddy. It was all tangled together, half dyed, half not, and super lumpy and unstable all at the same time.

** pick back up reading here **
So it was pretty clear at that point that I was not going to have the patience to deal with all those scraps in the large skirt pattern pieces, so I abandoned them for that purpose and decided to use my slightly larger scraps for the skirt. This time, since I was using bigger pieces I just pulled fabrics that leaned darker in tone, but notably they still covered the spectrum in terms of woven, stretch, natural, man made fiber content and various weights. I had draped a number of skirt options at the start of all this, but in the end was ambivalent about most of them, and decided it didn’t make sense to predraft the pattern without knowing the final properties of the fabricated material.


So I decided the best course of action was to make the fabric first, maximizing the yardage I had and just cut out a circle skirt waist that was 2x my waist measurement. When I had those pieces cut out, I literally laid them out on my floor (one at a time) and started placing and layering scraps. This process just took a lot of trial and error to get something that I thought was aesthetically pleasing. When I was happy with everything, I put my second piece of tulle on top and then secured it all with a million safety pins. I then sewed everything down, first with straight lines radiating from the waist to the hem, and then I would go back and individually secure pieces so I was sure nothing could flip around in between the tulle layers.


When I was finished with all my skirt pieces, I moved onto the bodice pieces. I draped a simple princess seam bodice and then moved the seamlines to form more of V shape, giving it a corset feel. Since these pattern pieces were much smaller than the skirt pattern pieces, I decided to revisit the dyed shoddy. I pulled bits of it and sandwich them in between two tulle pattern pieces but this time sewed everything down in a decreasing concentric outline of the pattern pieces.


I proceeded to quilt them in the same manner that I did the first pattern piece with concentric decreasing outlines, and was over the moon with how they turned out. Knowing I was going to want to highlight the seamlines with twill tape on the outside of the garment anyways, I sewed them all to the outside of the garment, which is a trick one of my professors at FIT had taught me. Once the bodice was all sewn together, I pinned it to my dress form, and draped the skirt pattern pieces, moving the pleats around until they just felt well placed and then tried it on myself for good measure. I then sewed them together and sewed them to the bodice in the same way as I had for the bodice with twill tape over the seam lines/allowances. So the insides of my dress are completely smooth and seam free. This worked out perfectly, because the mid and heavy weight tulle fabrics can be quite scratchy at their edges.


On that topic, though I left all the armscye and neck edges raw, I did apply some more twill tape along the armsyce edges, which is practically invisible from the outside of the garment and just acts as a buffer to my skin. I did toy around with adding a tulle ruffle detail along the front and back neckline edges, but ultimately decided there was enough going on that it really didn’t need those extra details. I did however follow through with my idea to add strips of the canan twill to my hem in place of horse hair. In the back and back sides I added 3 layers and on the front sides I added one layer. Because I had used different combinations of tulle weights between my front skirt pieces and back skirt pieces they had slightly different drapes and I used the cancan tulle to balance everything out.

The final touch was sewing in the very long zipper (I bought 3 yards of zipper tape (and I think I used about 2 of it) because I wanted it to run down the entire length of the back bodice and down the train as well. I also specifically purchased a zipper head with a hole in the pull so I could lace a long cut of twill tape through it as one last little detail.

I initially had a hard time finding these items and ended up purchasing them from Wawak, which if you don’t already know them, they are a sewing supple staple. They just have all these base products, that come in clutch. I kind of think of them as the Home Depot of sewing because it seems to me they serve both the professional and hobby sewist. And if I may I’d love to share one story I have from this experience. When I first ordered my zipper head and tape, even though I made sure to order them in the same size, when they arrived somehow the head did not fit on the tape, the teeth of the tape were just slightly too wide for the zipper head! I reached out to the instant customer service on their website and they immediately researched viable alternative options for me, overnighted me new zipper tape for free, told me to keep the one I had originally ordered, told me they would ask their QC team to fix the product descriptions to make them more clear that they didn’t work together and theeeeen followed up with a phone call/ voicemail the next day checking to see if the new product arrived and had worked out. It was literally the best customer service experience I have ever had in my life. So, big heart emojis to Wawak!

And with that I think my ramblings on this project are done for now. Probably, I will have more ramblings soon, as I figure out what to do with my shoddy…. I do still have that one pattern piece that I made, so maybe I will have a second corset style top on the blog soon.

As always, thanks for taking the time to read along, I know this was a long one! However, if you have any scrap busting projects that you have loved, please do send them my way! But please, nothing that involves mass dyeing lol!
Kten
บริการ สล็อต slot ด้วยระบบเกมใหม่ปัจจุบันของพวกเรา ได้ปรับปรุงแก้ไขให้มีความเสถียรภาพมากยิ่งขึ้น PG SLOT เล่นสล็อตผ่านมือถือ ก็ไม่มีหลุด เล่นได้ทุกระบบปฏิบัติการ จะเล่นโทรศัพท์มือถือเครื่องไหน คอมจำพวกใด
ReplyDelete