Mermaid meets Leviathan
So I have something a little outside of my normal style today:
A couple months ago I made my first ever trip to a Joannes. I live in Queens NY, so for me, in my neighborhood alone there are a ton of fabric shops, and then I work in downtown Manhattan, so for those of you not familiar, that means that in addition to having my own little queens garment area to spend all my hard earned bills in, the famed NYC garment district is also right smack in between where I work and where I live. Yea... I won't go into detail, but I'll say this. More than one summer friday has been spent 'taking my sweet time getting home' wink wink, nudge nudge.
Annnnnyways, a couple months ago, the hubs and I were upstate and we passed a Joannes, so having heard about this store on other sewing blogs I felt compelled to see what exactly it had to offer. Well. I have to say, I wasn't too impressed with the prices, but I was with the fabric selection and I came home with three extremely tiny pieces of batik print fabric. They must have been 45" wide... and typically I'm used to the long rolls of 60", so I found myself a little puzzled with that to do with my 1 yd cuts. The first I turned into a tank top, see here, and this is my second creation:

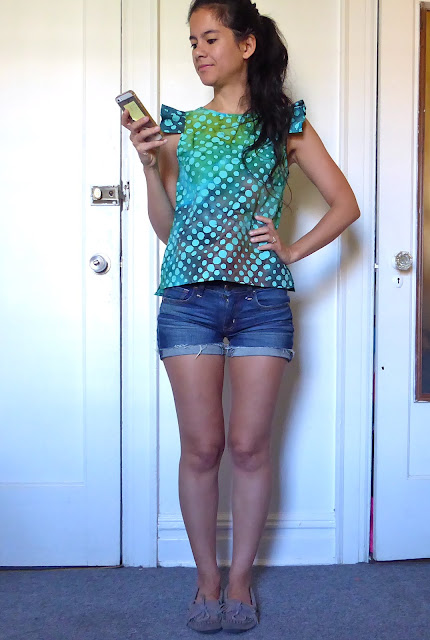
As you can see, it's another tank of sorts. Maybe some might call it a full shirt, but one thing is for sure, the sleeves on this thang are legit, in yo face, flutta'.


Annnnnyways, a couple months ago, the hubs and I were upstate and we passed a Joannes, so having heard about this store on other sewing blogs I felt compelled to see what exactly it had to offer. Well. I have to say, I wasn't too impressed with the prices, but I was with the fabric selection and I came home with three extremely tiny pieces of batik print fabric. They must have been 45" wide... and typically I'm used to the long rolls of 60", so I found myself a little puzzled with that to do with my 1 yd cuts. The first I turned into a tank top, see here, and this is my second creation:

As you can see, it's another tank of sorts. Maybe some might call it a full shirt, but one thing is for sure, the sleeves on this thang are legit, in yo face, flutta'.

When I was making it I asked the hubs to opine on whether he thought the sleeves were "a little much" or "just the right amount of too much". He went with "a little much" to which I responded (after a moment of silence) "Well they're staying" and then proceeded to add more length so they could be even more wing-ish. Lol. My husband is very patient with my creative process :oD. He has also dubbed this my Leviathan shirt. It struck me more as mermaid-ish, but I can see his point ;o).

As a base, I used the new Gemma tank pattern by Made by Rae, which I was lucky enough to test (Thanks Made by Rae!) and then went to town. Clearly adding the sleeves, but also cutting down the back, adding the strap and augmenting the hem slightly as well:

I specifically tried to push the back dip as low as I could while still covering my bra, but you can see in this picture I missed my mark by a hair. Arrrrghhhh. Egh, next time. The hem on the original pattern has a low curved hem, but I decided to straighten it and add a little high low action (because I always seem to do that), and then add some side vents (because I like vents in a woven top).

Before thinking about how it would affect the rest of the construction I decided to french seam the side seams and then I paid a mighty price on the first vent as I trial-and-error'ed my way through the process:

The Horror, The Shame! I've moved on though, because the second one came out OK. Boom.
All in all I had a lot of fun putting this little monster shirt together. It was a nice reprieve from the shiftier stretch fabric I have been working with lately, and though it's yet to be seen how much I'll actually wear it (with those sleeves), for me sometimes enjoyment I get out of the process is worth as much as the end result.
Kten
Comments
Post a Comment