The Sierra
Hey blogging world,
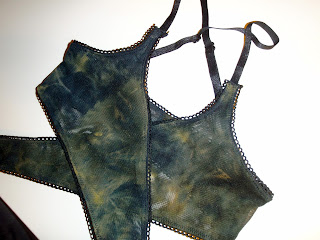
Have you guys ever heard of the blog Madalynne? There are a couple (2 as of right now) free bralette patterns on her blog and one of those is what I have for you all today. The Sierra:
I made some very small changes to the pattern, adding elastic to the bottom edge, turning it from a one strap halter into a two strap cross back and just sewing the two back ends together instead of putting on a hook (just because I didn't have one on hand), other than that I basically did what I was supposed to do. I think anyways. The pattern itself didn't come with instructions when I downloaded it, but Maddie put up a sew along on her blog which I glanced through.
I had some gey and yellow tie dye power mesh left over from my age of innocence tank, which I doubled up and used as the entire body of the bralette . It's quite stretchy, so I can't really claim it's super supportive, but it's cute and that's really all I was going for. For a tighter fit and to add a little more depth to the look, I like to twist the bottom strap before putting it on. Like so:
The power mesh I got at a local shop and the picot elastic and straps I got in the garment district (ny, ny) a couple months ago... Stash busting, heyo!
Besides reducing the stretch ever so slightly, doubling up on the power mesh allowed me to clean finish the elastic on the top edge from both sides. Basically I sewed the elastic picot side down sandwiched in between the two pieces, then flipped them right sides out, pressed and top stitched. The elastic is a little wavy on the table, but when it's on that flattens out and I think the finish came out quite nice. The bottom elastic I sewed more traditionally, sewing the picot to the right side facing up and then flipping down and to the back to sew in place again. All in all a fairly quick make and cute, you all should check it out!
Kten :o)


Comments
Post a Comment